Spring is fast approaching and with it one of my favorite crafts. I collect painted and dyed real eggs as a hobby and so several years ago I learned how to do pysanky, the traditional Ukrainian form of egg dying. I have shown many people how to practice this art and I have been thrilled by the innovative creations people have made. I would like to share the tools and techniques with you here. I recommend creating pysanky as a wonderful coven activity for Ostara.
The egg has long been a symbol of new life and new beginnings in many cultures. The ancient Ukrainians believed the universe was born from a cosmic egg and that each egg symbolizes both the sun and the moon, in the golden yolk and nourishing white. People decorated eggs in the spring to welcome back the sun and ensure the fertility and rebirth of all living things. The earliest ceramic pysanky found date to 1300 BCE but the motifs can be traced to the Trypilljan culture of the Ukraine circa 3000 BCE. Ukrainians are very proud that this practice is pre-Christian; today the ancient Pagan symbols exist side-by-side with Christian traditions. People still decorate eggs as gifts for special friends, as protections to put over barn doors or to be buried in fields to convey fertility. Decorating eggs, whether with traditional designs or with personal motifs, can be lots of fun.
A pysanka is created using a wax resist technique somewhat like batik. Pysanka is derived from the Ukrainian word pysaty , "to write", and designs are written or drawn on the egg with melted beeswax. As the egg is placed in a succession of colored dyes from lightest to darkest, wax covers up the lighter parts until the entire egg is done. The wax is then removed and the beautiful polychromatic patterns are revealed.
To do pysanky you need clean, unblemished, room temperature eggs. A solution of water and vinegar should be used to clean the eggs. You need a kystka and a block of beeswax to apply designs and a candle to melt the wax. Holding your kystka in the candle flame will turn the beeswax dark so that your designs show up. It is a good idea to start with a practice egg so that you get a feel for how the wax flows and to give yourself time to build up black wax. Kystky come in several sizes, medium is a reasonable size to start out with. (Look for the modern single wire delrin kystka - the traditional wrapped wires can trap wax which can drip at inopportune times.)
Once you have a basic set up, dyes all mixed and ready, candle, beeswax, kystka and egg now what do you do? Most traditional designs call for dividing the egg into equal sections. Light marks can be made with a pencil, but do not try to erase them as the erased areas will not take dye properly. Also be aware that if the pencil marks are in areas that will be left white they may show on the finished egg. Despite these caveats, such marks can be very helpful in charting your design.
Once you have your design in mind begin laying wax on the parts of the egg you wish to remain white (or brown if you are using brown eggs for a more sepia-toned egg). Place the waxed egg in the first color (often yellow) and then wax over the parts to remain yellow. Continue through each color needed ending up in a dark color such as black, navy blue or red. An interesting fact is that green dyes should be applied with q-tips rather than by immersion if only a small area is to be green. Orange dye dissolves most other colors. I mix two jars of orange - one for dying eggs and one for rinsing. You can actually start out in one color group and then wash off a dark dye after waxing, go back to a lighter color and finish with a different color sequence.
To remove the wax from the completed egg, hold it near (but not in) the candle flame until the wax begins to soften and then wipe it clean with a paper towel. Once the wax has been removed the egg can be varnished. Traditionally pysanky eggs are not blown, but many people prefer to blow the finished egg. For unblown eggs it is said that if it survives its first year it will last forever. Some people have reported that at about year three dogs find the unblown eggs fascinating even though people can't smell anything. (Being a cat person I cannot corroborate this report; my cats seem totally uninterested.) It is not practical to use pre-blown eggs for pysanky because they are hard to hold down into the dyes. Also the wax plugs needed to close the holes mean egg colored spots on top and bottom. And if dye should get inside it can drip out at unfortunate times and ruin a completed design, clothes or furniture!

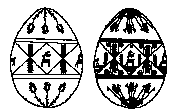
Above is a simple traditional three-color design (two dyes and the egg color). I figured traditional Ukrainian symbols like stags and wheat sheafs are equally meaningful to Wiccans. Write the designs on the first egg pictured onto the bare egg, then dip it in yellow and wax the additions from the second egg, then dip the egg into your last color - green, turquoise or blue are all great choices. This gives a quick introduction to the art of pysanka. There are design books available with many more suggestions for traditional eggs. However, I have found that the adventurous Pagan's creative imagination is all that is required to create beautiful and magical eggs. One of my first eggs alternated paleolithic Goddesses and Moonlit Cauldrons (our coven symbol).
Sources:
As spring approaches, some art supply stores or museum shops may
carry pysanky kits. A starter kit complete with dyes, kystka, beeswax and
instructions is a good way to begin. However, if a group effort is intended it
is probably better to get one kit and a bunch of extra kystky and wax. The
Ukrainian Gift Shop, 2422 Central Ave., NE, Minneapolis, MN 55418, (612)
788-2545, has always been a fast and reliable vendor for mail order in my
experience. They have also published an excellent beginning book, Ukrainian
Easter Eggs and How we Make Them.
If you are interested in history and symbols for pysanka, an excellent booklet called
Pysanka: Icon of the Universe by Mary Tkachuk, et al., is available from them
or from its publisher, Ukrainian Museum, 910 Spadina Cresent East, Saskatoon, Sask,
Canada S7K 3G9. I found the traditional symbol for Grand Goddess
(Bohynja-Berehynja) in this book.
reprinted from Covenant of the Goddess Newsletter , Vol. 17, Ostara 1992,
© 1991 Rowan Fairgrove
Bill Yakowenko's Pysanky page A lovely collection of egg pictures, plus links to other sites.
Pysanka.com Adriana's eggs plus instructions and history.
Ukrainian Gift Shop. These lovely people are the premier suppliers of books, dyes, kitska, kits and supplies for pysanky in the United States.
Ukrainian Easter Eggs |
|---|

 This Beautiful
Pysanky WebRing site
is owned by |
| Prev | Next | Random | Next 5 | Join | List Sites |